Guide >
Preferences
Set appearance, AI, REAPER, audio devices, and project folders separately. Change only what your current task needs.
Open settings and save changes
Open Preferences and choose a category on the left. Save after making changes and check for category-specific failures. Closing the window should not be treated as confirmation that everything was saved.
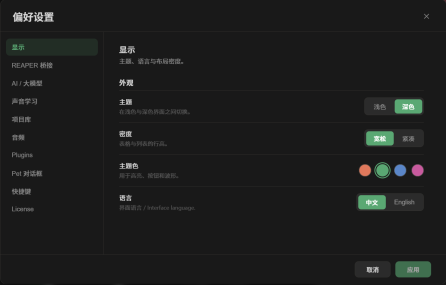
What each category controls
- Appearance
- Language, theme, accent color, and density. Use density for a more compact list.
- REAPER Bridge
- Configure, deploy, and check the bridge. Start here for failed automation, preview exports, or transfers.
- AI / LLM
- Provider, model, service address, API Key, and online connection testing.
- Sound learning
- Manage whether sound-related features use preference learning from your feedback.
- Project Library
- Add REAPER project roots, set scan scope, and rescan.
- Audio
- Choose input and output devices. Check here for silent playback or missing microphone input.
- Plugins
- Plugin scanning, REAPER location, and capture settings.
- Pet dialog
- Pet conversation persona and related preferences, not sound-library retrieval.
- Shortcuts
- Inspect and change keyboard controls. Check for conflicting keys here.
- License
- Check login, license, and use status. A Full Version single license allows one computer at a time.
A feature still does not work?
- •AI: test the connection, rather than only checking whether a Key is filled in.
- •REAPER: confirm a connected status and a running bridge inside REAPER.
- •Audio: distinguish input from output. Reselect a device after replacing USB hardware.
- •Project Library: scan after saving roots. A saved folder is not a completed index.